Netscaler Access Gateway as home gateway for Citrix and Horizon View

Background:

Recently I configured Citrix Products (XenApp, XenDesktop, PVS) and Horizon View Products (View,  Hosted Application, App-Volume, UEM) to my home lab.. I  have only one external IP address (Thanks to Comcast that they do not change external IP frequently any more.) and would like to access both environments remotely. After researching through internet and support from Carl Stalhood (very nicely written blog for NS.) I was able to configure NetScaler as an external gateway into my lab environment.

Below is the configuration for my Citrix NS VPX Express edition v11.

Before you begin I would recommend a wild card certificate, for me it was very necessary so I bought it from Comodo for $75.

See Carl Stalhood blog for in detail NS configuration and SSL/CSR request and installation.

I do have two factor authentication using two different vendors (Duo Security and WiKID  -will write blog on next) for my Horizon View and Citrix environment.

Once the initial configuration and license configuration is configured next step is to setup LDAP server and policy. To do this click on System > Authentication>LDAP>Server to add new server.

 
Now we need to create AD Policy.

The next step is configure the Citrix Storefront in NetScaler as a Gateway.
To configure this Click on XenApp and XenDesktop and click on Configure New.
Select Storefront and Continue
Type NS Internal IP address , Virtual Server Name (for your own record) and if you want to redirect port 80 to 443 select the check box for it. Type external URL for your domain.
Select the server certificate that you configure earlier.
Select the Authentication policy, in this case we already configure LDAP so select that policy.
You can select here second Authentication policy if you already configure or you can add it later
Next is configuration of Storefront server/s.
Configure the XenApp /XenDesktop Farm
At this point you are almost done for NS configuration, next is to configure newly created NS gateway in to Stroefront server.
To configure Nestscaler in Citrix Studio or Strorefront if you deployed separately. In my environment Storefront 3.0 is installed on the same server as Desktop Studio.
Click on Citrix StoreFront and the store you already created and then click on the Enable remote access.
Type the Display name as you like, Type NS Gateway URL (External IP (In my homelab it is natted) through my Main Router.  You can type subnet IP address or MIP as a optional and logon type as Domain, Callback URL is optional too..
Next you need to configure the STA, You can use  server FQDN or IP address. I choose to type IP address and in my lab my Studio is also a STA server.
Once you type the STA URL you are almost done and according to your network setup you may need to open the firewall for external access and test the configuration.

At this point you already configured your Citrix XenApp or XenDesktop through NS. Next is to configure the VMWare Horizon View Setup.
Horizon View Lab Background:
In my lab I have configured Horizon View 6.0.1 and servers are below.
[1] Connection Server – CS1HV6Lab.mydomain.local
[2] Security Server – SC1HV6 ( Not jointed to Domain)
[3] Composer Server – CM1HV6lab.mydomain.local 
[4] vCenter Server – VClab.mydomain.local
At this point I am assuming that you already paired your connection server with security server and you have atleast one app or desktop to test.
In Netscaler we need to configure the load balance server first. To do this connect to management console of NS and Click on system and Traffic Management.
As you can see on above screen I already created Connection server and Security server, In order to do this you need to click on ADD >

Type the name you can recall and then IP address of the Connection Server. You can leave the blank for the Traffic Domain.
Configure the Security server the same way as above.
Now, we need to configure the Services. Todo this click on the
Traffic Management > Load Balancing and Services. As you can see below on screenshot I already created services as follow
[1] Security server Policy named as HV Sec Server for 443
[2] Security server Policy named as HV_Blast_SC for 8443
[3] Connection Server Policy named as HV_CS_Server for 443
To create the services click on Add Services below is the screenshot from the Blast Protocol Service as mention on [2] above.
Type the Service name and choose the Existing Server (Select the Security server from the dropdown) and Select SSL as a Protocol and then Port  is “8443” for blast.
You can now use the same method for adding remaining policy and remember to change port from 8443 to 443..
Once you configured the services next step is to configure Virtual Servers. To do this select Virtual Servers from the Load Balancing Tab.
As you can see on above screen shot I already configured virtual server for Connection server and Security server. To do this select Add and then type
Name – As name of the Service, I choose HV_SC_Blast and then Protocol as SSL and IP Address Type is Non Addressable.

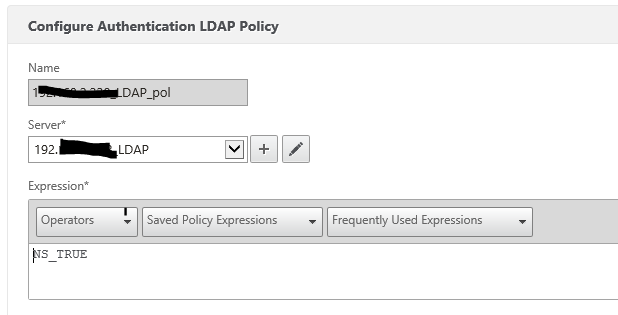
Create the same policy for the Connection server and one for blast.

Next you need to configure the Action and content switching policies. Todo this select Traffic Management > Content Switching > Actions

As you can see on below picture I already created two action policies one for Security Server – Blast and one for CS server.

To create policy Click Add and type the policy name and select the Virtual server from the drop down for that policy.

Create the same policy for Connection server.
Next is to configure the Content Switching policy.
Todo this select Add >  Type the CS policy name, Action for this policy and then Expression.
Below picture I have created policy for authentication. You can type the name, Action to as HV_CS_Policy and then expression as “HTTP.REQ,HOSTNAME.CONTAINS(“MYSUBDOMAIN.MYDOMAIN.COM”
As above expression NS will look the hostname from the browser request and if it match the rule it will redirect it to this expression and action.
We need to configure the second policy for Blast protocol. I know there might be a different way to achieve this but I did this way. If you have any other way please add it to the comment section below and I will confirm and add it to my blog if necessary.
Above expression NS will look for the destination port request if it is matches the expression in our case if client is requesting on TCP 8443 it will redirect that request directly to security server.
At this point you are almost done in the traffic management tab. Next you need to go back to the NS Gateway section of the XD and then add this two new policy in to the content switching area. To do this please see below.
Select the NetScaler Gateway and then select Virtual Servers. You should be able to see the Virtual server you created earlier for the XenDesktop. select the server and click edit.
Now on edit screen, Select the Content Switching Policy Binding and click on + sign to add it.
On the next screen on VPN Virtual Server Content Switching Policy Binding click on Add Binding
Select the Policy from (We already created two policy for port 443 and 8443)
Bind all the (two policy) for this server and click oaky and close the screen.
Final Step in NetScaler is to save configuration.
ave the NS configuration.
To save the configuration select System and Clock on the Save icon.
Next and final step is to configure the security server setting on Connection server management console.
Logon to view management console and then select servers and select the Security server >Edit
select the external URL for Horizon view setup, remember this name has to be match in Netscaler Content switch expression , select the external IP address and the blast external URL as external URL.
Below is the screenshot for the connection server profile.
Please remember you need to open the firewall ports according to your setup. In my case I open port 443, 4172(TCP/UDP) and 8443 from my main router to my secondary home router and then from the secondary home router to NS ports I opened are only 443. 4172 and 8443 are directly open to the Security server. I also add A name record into my domain provider to my primary router IP. As I mention earlier that it seems Comcast are not changing the IP address anymore so my setup is stable at this point.

You might be interested in …

Duplicate “ViewClient_Client_ID” and Multi Session issues on Horizon View

Horizon View, VMware

Multi-Session Issue on VMware Horizon View Due to Duplicate “ViewClient_Client_ID”   Problem:              When we enable the “Allow multiple sessions per user” settings in VDI Pool, a user that connect from different client devices receive different desktop sessions. To reconnect to an existing desktop session, user must use the same […]

Read More

Deployment of VMware Unified Access Gateway (UAG) on AWS as EC2 instance

Horizon View, VMware

Deployment of VMware Unified Access Gateway (UAG) on AWS as EC2 instance In this post, I’ll provide guidance on how to Deploy VMware Unified Access Gateway in AWS Amazon Native VPC as EC2 instance.  Before we proceed, currently UAG FIPS is only supported on the vSphere environment to all other deployment such as AWS and […]

Read More

Unified Access Gateway with Microsoft Azure AD Integration using SAML

Many customers are moving towards extending their Datacenter workloads to the clouds, and Microsoft Azure is one of the partners that the VMware EUC team works very closely with. VMWare Unified Access Gateway, what we called “UAG,” is available in the Azure AD app gallery directly, reducing and simplifying the efforts of integration and configurations.  […]

Read More

Leave a Reply

Your email address will not be published. Required fields are marked *