VMware PowerCLI is a collection of Windows Powershell modules that are used to manage and maintain a VMware virtual environment. VMware PowerCLI contains modules of cmdlets based on Microsoft PowerShell for automating vSphere, VMware Site Recovery Manager,vSphere Automation SDK, vCloud Director, vCloud Air, vSphere Update Manager, vRealize Operations Manager, VMware Horizon, NSX-T, and VMware Cloud on AWS administration. VMware PowerCLI provides a PowerShell interface to the VMware product APIs. PowerCLI is a great tool for system administrators and can be used to gather detailed information and/or execute bulk commands against multiple VMs, Hosts, Network or Storage devices.
It is typically installed on Microsoft Windows-based operating systems. A desktop or server must have network access to the VMware vCenter server(s) and be capable of running a minimum of Windows PowerShell 2.0 with .NET 3.5 SP1 pre-installed. However, it is highly recommended to install the very latest official releases of Powershell and PowerCLI modules.
This step by step procedure is to prepare your system to run VMware PowerCLI Version 10 (released February 2018), configure shortcuts to your infrastructure and make the first connection to your vCenter server(s).
For this demonstration, we are using Windows Server 2012 R2 (64 bit) to connect to a VMware ESXi 6.5 vCenter server. The user accounts have administrator rights in Windows & VMware.
- Check which version of Powershell is being used, and if applicable update it to the latest release (version 5 at the time of writing).
- Open Powershell.
- Always use ‘Run as Administrator’ privileges. This can be done by navigating to (C:\Windows\System32\WindowsPowerShell\v1.0\powershell.exe) or search for Powershell on the start menu, right-click on the powershell.exe application and choose Run As Administrator. You can also right-click on any start menu or desktop shortcuts you may already have for Powershell.
- Type $psversiontable – this will tell you what version you are running. Look for the field “PSVersion”. In this example, I am running PSVersion 4.0

-
- Run the following command to install Official VMware PowerCLI
- Install-Module VMware.PowerCLI -Scope CurrentUser
- Follow the below screenshots


- After that, we must Allow Execution of Local Scriptsusing the following command

Test and Validate PowerCLI Module and Connect to vCenter
- Simply type Get-Module -ListAvailable -Name VMware* to ensure Powershell has installed the PowerCLI
Get-Module -ListAvailable -Name VMware*

- Let’s connect to vCenter via IP or DNS name, to validate the installation.
connect-viserver YOUR vCENTER IP OR DNS

The yellow verbose text will be displayed as the connection to vCenter is established:Depending on your user account privileges, you may be asked to log in, if you are, enter your credentials for the vCenter server
-
- You are connected to vCenter when you see this output from the shell. It displays the vCenter IP, the User connected and the port used:
Create a shortcut on your desktop to connect it automatically.
-
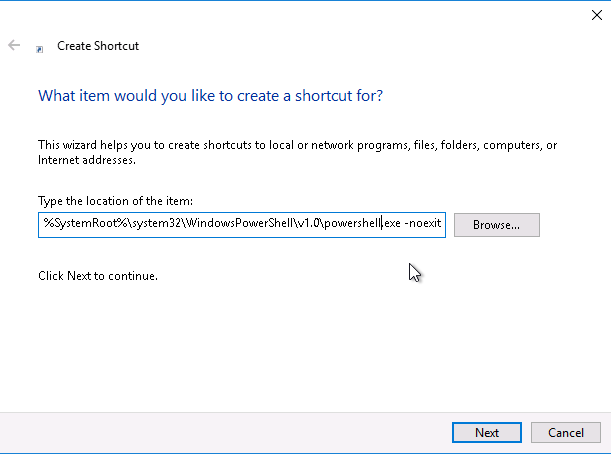
- On your Desktop, Right Click and Select new Shortcut:
- In the “Type your location” window enter %SystemRoot%\system32\WindowsPowerShell\v1.0\powershell.exe -noexit -command “connect-viserver YOUR-VCENTER-SERVER1 , YOUR-VCENTER-SERVER2 (Ensure you substitute your Actual IP addresses):
- Click Next and Enter a name for your shortcut (eg. PowerCLI Site X or PowerCLI Site Y):
- Click Finish to complete the process. You can now double click your new shortcut to directly connect to the vCenter Servers with PowerCLI at any time.
If you need to know more about the other PowerCLI commands please look into PowerCLI docs site. VMware PowerCLI Documentation